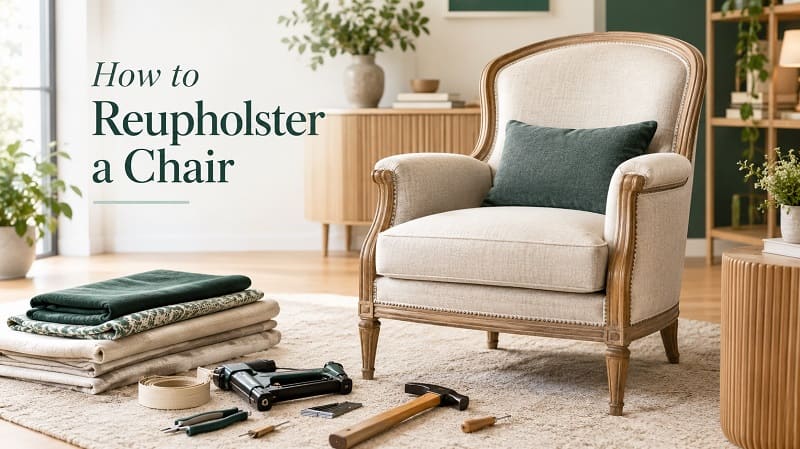
Reupholstering a chair is one of the few home projects where a beginner can get a genuinely professional result, as long as they understand why each step exists. Most guides tell you to pull the fabric tight and staple it. That advice is not wrong, but it is the reason so many first attempts end up with puckered corners, a seat that bottoms out after six months, and staples showing along the back.
This guide walks through the whole job the way an upholstery shop approaches it: evaluate the chair first, strip it with intent, fix the structure underneath, then cover it. It covers dining chairs, occasional chairs, and fully upholstered armchairs, plus the judgment calls that decide whether a chair is worth doing at all.
Which chairs are actually suitable for reupholstery?
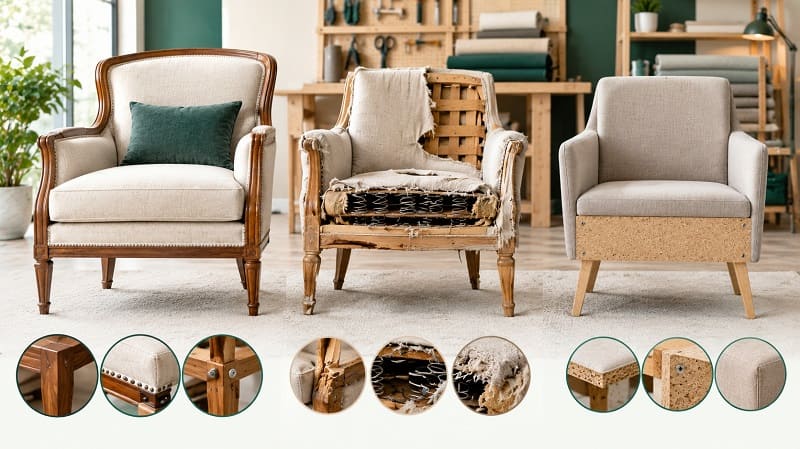
The single biggest mistake homeowners make is choosing the wrong chair. Reupholstering a chair costs the same in labour whether the frame is a 1940s hardwood beauty or a flat-pack piece made of stapled particleboard. The fabric alone can outvalue the chair.
Good candidates for chair reupholstery
| Sign | Why it matters |
| Solid hardwood frame (maple, beech, oak, ash) | Holds staples and tacks, takes glue, survives repeated re-covering |
| Joints are doweled, mortise-and-tenon, or screwed with corner blocks | Can be re-glued and clamped rather than replaced |
| No creak or racking when you push the back sideways | Structure is intact |
| Eight-way hand-tied springs or sinuous (zigzag) springs still anchored | High-value construction that is worth restoring |
| The chair is comfortable and the right proportions for your room | Comfort comes from the frame geometry and cannot be bought back later |
| Sentimental, antique, or a well-made mid-century piece | The frame is the asset, not the cover |
Poor candidates
- Particleboard or MDF frames. Staples do not hold reliably in engineered board, and screw holes strip. If the seat platform is particleboard you can cut a replacement from 3/4 inch plywood, but if the whole frame is board, walk away.
- Chairs that already rock, creak, or twist. New fabric hides nothing structural. It will feel worse, not better, because you will have tensioned material over a moving frame.
- Heavy water damage, rot, or active woodworm. Soft, crumbling wood will not hold fasteners.
- Chairs with a persistent mould or smoke odour deep in the padding and frame. Odour lives in the wood as well as the foam. Stripping helps, but a heavily contaminated frame often keeps its smell.
- Anything where the finished cost exceeds the price of an equivalent secondhand chair in good condition. That is a maths problem, not a craft problem.
When a chair should be repaired instead of reupholstered
If the cover is sound and only the comfort has gone, you may not need a full re-cover at all. A few common repairs:
- Sagging seat, intact fabric. On many chairs the seat deck is accessible from below by removing the cambric dust cover. New webbing or replacement sinuous spring clips can be fitted without disturbing the top cover.
- One worn arm or a single split seam. A seam can be hand-sewn closed with a curved needle and matching thread. A single panel can sometimes be replaced if you can source the fabric.
- Flattened cushion, good cover. Replacing the foam inside a removable cushion cover is a twenty-minute job and often fixes what feels like a “worn out” chair.
- Loose joints only. Disassemble, clean off old glue, re-glue with PVA or hide glue, clamp, and let it cure. This is furniture frame repair, not upholstery.
When to hire a professional upholsterer
Be honest about the following. Any two of them together is a good reason to get a quote:
- Eight-way hand-tied springs that need re-tying. This is a skill, not a procedure. Done badly, the seat is worse than before.
- Channel backs, deep buttoning, or tufting. Getting even button depth across a curved back takes practice and the right long needles and twine.
- Tailored piping on curved arms, scroll arms, or wings. The sewing, not the stapling, is the hard part here.
- Antiques with original horsehair, marsh grass, or traditional stuffing. Stripping these destroys value. Conservation-minded shops work differently on these pieces.
- Recliners, swivel mechanisms, and anything with a mechanism. Reassembly tolerances matter and pinch points are real.
- Leather and vinyl. Leather does not forgive a staple hole, cannot be re-tensioned once set, and needs different tools.
Know which type of chair you are dealing with
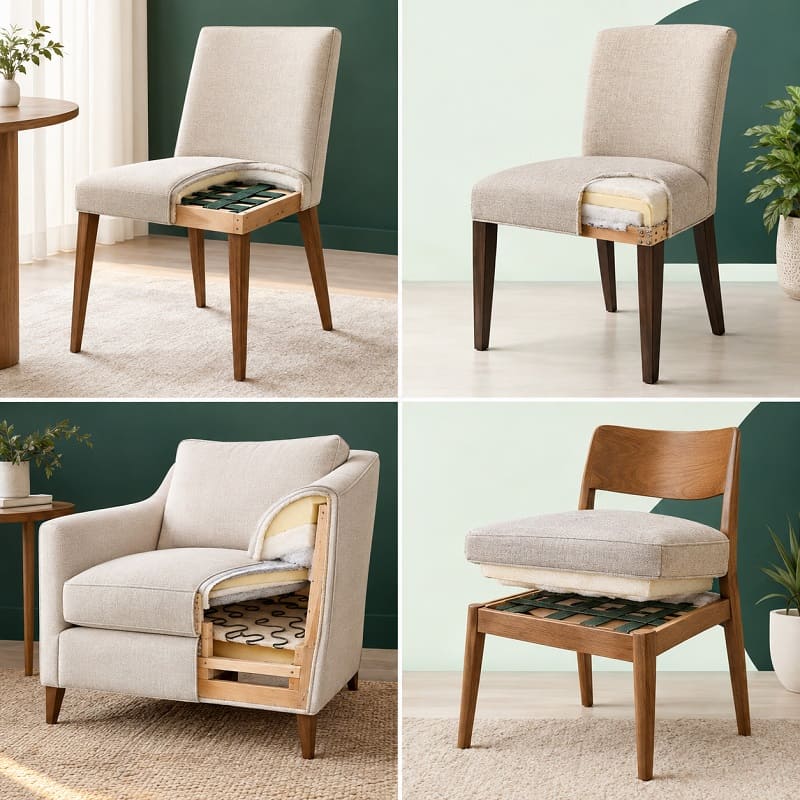
Before tools come out, identify the construction. It determines everything about the method.
- Drop-in or slip seat. A separate wooden or plywood seat panel that lifts out or unscrews from below. This is the classic beginner project and the fastest route to a good result. Padding sits on the panel; fabric wraps to the underside.
- Pull-over or tight seat. The fabric is stapled directly to the chair frame rails, usually finished with a decorative edge such as gimp braid, double welt, or nailhead trim. Harder than a slip seat because there is no underside to hide your mistakes.
- Fully upholstered chair (armchair, wing chair, club chair). Multiple panels: inside back, outside back, inside arms, outside arms, deck, front border, arm fronts, plus welt and sometimes a skirt. Panels are installed in a strict sequence and often sewn before fitting. This is where most people underestimate the work.
- Cushion-only chairs. Frame is exposed wood, cane, or webbing, with loose cushions. Often just a sewing project.
Tools and materials for reupholstering a chair
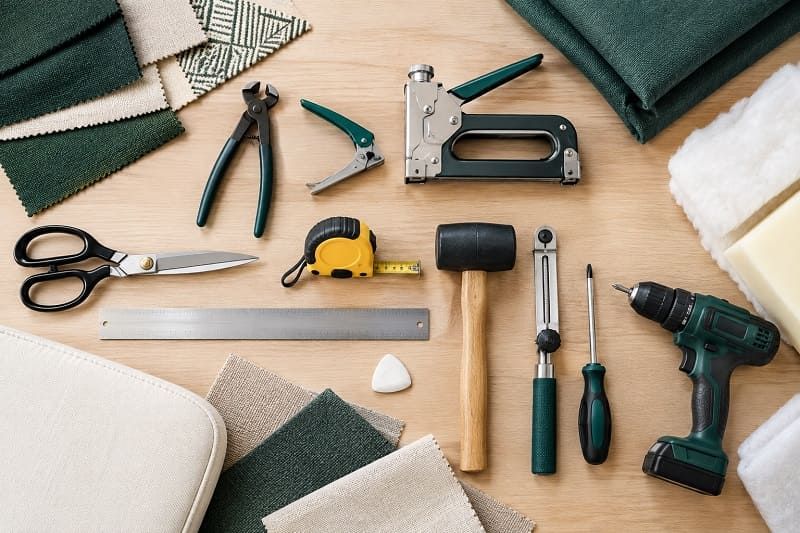
You can complete a slip seat with about six tools. A full armchair needs more.
Essential upholstery tools
| Tool | What it does | Notes from practice |
| Staple remover / tack lifter | Lifts staple crowns out of wood | Buy a proper upholstery staple remover with a forked tip. A screwdriver rounds the crowns and you end up digging |
| End nippers or diagonal pliers | Grips and pulls broken staple legs | Indispensable. Half of stripping is pulling out legs left behind |
| Staple gun | Fastens everything | See staple gun section below |
| Fabric shears (8 to 10 inch) or a 45mm/60mm rotary cutter with mat | Clean cuts | Keep one pair for fabric only. Cutting batting and cardboard blunts them |
| Tape measure and long metal straightedge | Measuring and squaring | A 24 inch clear acrylic quilting ruler is faster and more accurate than a tape for cutting |
| Tailor’s chalk or a chalk marker | Marking the back of the fabric | Never mark the face |
| Rubber or rawhide mallet | Seating tack strips, closing trim | A steel hammer marks wood and crushes welt |
| Regulator (a long upholstery needle-like tool) | Adjusts stuffing and padding through fabric without cutting it | The single most useful “why did nobody tell me” tool |
| Flat-head screwdriver, drill/driver | Disassembly | Bag and label all hardware |
| Curved upholstery needles and waxed thread | Blind-stitching outside backs and closing seams | Needed for almost any chair with arms |
| Webbing stretcher | Tensions webbing against the frame | Do not substitute pliers and hope |
| Safety glasses and cut-resistant gloves | Staple fragments and tack points | Non-negotiable during stripping |
Optional but transformative on bigger jobs: a pneumatic or electric long-nose upholstery stapler, a hot glue gun for gimp braid, a spray adhesive for foam, and a sewing machine capable of handling upholstery weight thread if you are making welt.
Materials
| Material | Typical use | Selection notes |
| Upholstery fabric | The cover | See fabric section below. Minimum 15,000 double rubs for a chair in daily use |
| High-resilience polyurethane foam | Seat and back padding | 1.8 lb/ft³ density minimum; 2.0 to 2.5 preferred for daily use |
| Polyester batting (Dacron) | Wrapped over foam | Softens edges, stops foam abrading against fabric |
| Cotton or felt padding | Over springs or a bare deck | Traditional layer that prevents foam from feeling the spring edges |
| Jute or elastic webbing | Seat and back suspension | 3.5 inch jute, red-stripe grade for seats, black-stripe for backs |
| Burlap or spring cover cloth | Over springs, under padding | Protects the foam from spring wear |
| Cambric dust cover (black) | Underside finish | Cheap, and the difference between “homemade” and “done properly” |
| Cardboard tack strip | Blind tacking straight edges | Gives a crisp, staple-free finished line |
| Flexible metal tack strip (Ply Grip) | Finishing outside backs and arms | Creates a factory-clean closed edge without visible fasteners |
| Welt cord / piping cord | Piping along seams | 5/32 inch and 3/16 inch are the common sizes |
| Gimp braid, double welt, or decorative nails | Covering the staple line on show-wood chairs | Choose before you cut, since it affects trim allowance |
| Staples | Everything | See below |
Which staples to use
Upholstery uses fine-wire staples, not construction staples. Typical shop choice is 20 to 22 gauge, with leg lengths from 1/4 inch to 9/16 inch:
- 3/8 inch is the everyday size on hardwood frames and slip seats.
- 1/2 inch for thicker layers, softer wood, or when fastening webbing and multiple layers at once.
- 1/4 inch for thin trim work and delicate show-wood edges where a longer leg would split the wood.
If staples are not seating fully, the wood is too hard for the gun’s power or the gauge is too heavy. Tap the proud ones flush with a mallet rather than shooting more on top of them. A manual staple gun works for a slip seat, but on an armchair with hundreds of staples, a pneumatic or electric long-nose gun saves your hand and gives far more consistent penetration.
What does it cost, and when is reupholstery worth it?
DIY materials for a simple drop-in dining seat usually fall somewhere around $25 to $60 per seat, depending mostly on fabric price. A fully upholstered armchair done at home often runs $150 to $500 in materials, with fabric being the dominant cost.
Professional reupholstery is labour-heavy. HomeAdvisor’s cost data puts the typical chair reupholstery in the range of $300 to $1,100, with most homeowners paying around $750, labour at $40 to $100 per hour, and fabric at $15 to $100 or more per yard.
That spread is the whole story. Reupholstery is economical when:
- The frame is genuinely better than what the same money buys new. A 1960s hardwood frame with doweled joints usually is.
- You want a specific fabric, colour, or performance textile that is not available on retail furniture.
- The chair fits a space or a body in a way new furniture does not, which is common with antique dining chairs and older armchairs.
- You are doing a set. The second, third, and fourth dining seat go three times faster than the first.
It is not economical when the piece is low-end modern construction, when the chair needs spring re-tying and frame rebuilding on top of a re-cover, or when you are paying shop rates on a chair whose replacement cost is lower than the quote. Ask for the quote to be itemised into labour, materials, and repairs so you can see what you are actually buying.
How much upholstery fabric do you need?
Fabric is usually the largest line item, so getting the yardage right matters. North American upholstery fabric is commonly sold 54 inches wide, and published yardage charts assume that width with no pattern repeat.
Typical yardage by chair type
| Chair type | Approximate yards of 54 inch plain fabric |
| Drop-in dining seat | 1/2 to 3/4 yard each (one yard often does two small seats) |
| Dining chair with upholstered seat and back panel | 1 to 1.5 yards each |
| Slipper or occasional chair | 4 to 6 yards |
| Standard armchair / accent chair | 5 to 7 yards |
| Wing chair | 6 to 8 yards |
| Club chair with loose cushion and welt | 7 to 9 yards |
Treat these as a starting point, not a quote. Four things push the number up:
- Pattern repeat. Every panel has to start at the same point in the pattern, so you lose the offcut between repeats. Trade fabrication guides handle this with a multiplier: as a worked example, 54 inch fabric with a 10 inch repeat takes a 1.2 multiplier, so a 15 yard job becomes 18 yards. Large repeats of 20 inches and up can add considerably more.
- Directional fabric and nap. Velvet, chenille, corduroy, and most printed patterns run one way. You cannot rotate a panel to save fabric. Velvet has the added rule that the nap should run down the back and toward the front of the seat, so the pile lies with the direction of use and the colour reads consistently.
- Railroading. Some fabrics are woven so the pattern runs along the roll rather than across it, which lets you cover a wide back in one piece with no seam. If your fabric is railroaded, yardage can drop noticeably. If it is not, a wide chair back may need a seam or more yardage.
- Your own margin for error. Add 10 to 15 percent on a first project. Running short means a second dye lot, and dye lots do not match. Order everything at once.
The reliable way to measure
Lay a tape over the chair and measure each surface at its widest and tallest point, then add 4 inches in each direction for pull and staple allowance (6 inches on deep or heavily curved panels, since fabric gets consumed fast going over a crown). Sketch the panels onto a scaled layout of a 54 inch wide strip, arrange them as they would be cut with the grain running vertically, and read the length off the layout. That gives a real number rather than a guess. Many fabric suppliers also publish a fabric yardage calculator that follows the same logic.
How to choose upholstery fabric
A beautiful fabric that is wrong for the chair will fail, and there is no way to fix it after the fact. Four filters, in order of importance.
1. Abrasion resistance
In North America, durability is tested with the Wyzenbeek method (ASTM D4157) and reported in double rubs. Each back-and-forth pass of an abradant counts as one double rub. The Association for Contract Textiles uses 15,000 double rubs as the general contract upholstery threshold and 30,000 double rubs for heavy duty.
Practical reading for a home:
- Under 9,000: decorative only. Occasional chairs that nobody sits in.
- 9,000 to 15,000: light residential use, guest bedroom chairs.
- 15,000 to 30,000: the sensible target for a dining chair or a daily-use armchair.
- 30,000+: family rooms with kids and pets, or anything that gets used all day.
Two caveats worth knowing. Europe uses the Martindale test instead, and there is no correlation between Wyzenbeek and Martindale results, so you cannot convert one to the other. And double rubs measure abrasion only. They tell you nothing about staining, fading, pilling, or seam slippage.
2. Construction and weave
- Tightly woven beats loosely woven for seating. Loose weaves snag and shift under tension.
- Weight matters more than fibre content for handling. Medium-weight wovens are far easier for a beginner than either slippery lightweight fabrics or very thick, stiff ones.
- Avoid stretch knits and quilting cottons. Quilting cotton is roughly a third the weight of upholstery cloth. It will look fine for a season and then go thin at the front edge.
- Loose bouclé and long-pile fabrics look wonderful and are punishing to work with. They distort under tension and show every inconsistency.
3. Fibre behaviour
- Polyester and olefin resist abrasion and fading well and take cleaning codes W or WS.
- Wool is resilient, self-recovering, and expensive, and it hides staple lines well because it has body.
- Cotton and linen breathe and look good but wrinkle and stain more readily. Blends solve much of this.
- Performance fabrics combine abrasion resistance with a separate stain-resist finish. Those are two different properties, so check for both rather than assuming.
- Leather and vinyl need heat, patience, and unforgiving accuracy. Not a first project.
4. Pattern and scale
Small-scale or non-directional patterns are forgiving. Large-scale patterns, stripes, and plaids demand centring and matching across panels, which is what pushes yardage and difficulty up. Stripes on a curved surface also reveal any tension inconsistency instantly, because the eye reads a bent stripe as an error.
Always order swatches and look at them in the actual room, in daylight and at night. Screen colour is unreliable.
A note on flammability rules
In the US, 16 CFR Part 1640 requires upholstered furniture that is manufactured, imported, or reupholstered on or after 25 June 2021 to comply with California TB 117-2013, with the permanent labelling requirement applying from 25 June 2022. This is aimed at commercial operations rather than a homeowner recovering their own dining chair, but if you are reupholstering for sale, or simply want to keep your chair to the same standard the industry works to, buy cover fabric and filling materials that state TB 117-2013 compliance. Reputable suppliers publish this on the product page.
Foam, batting, webbing, and padding: what actually goes under the fabric
This is the section most DIY guides skip, and it is the reason so many reupholstered chairs look great and feel wrong.
Foam: density is not firmness
Two different specifications, constantly confused:
- Density (lb/ft³) is how much material is in the foam. It determines how long the foam lasts.
- ILD (Indentation Load Deflection) is how much force compresses the foam. It determines how firm it feels.
You can have soft-and-durable foam or firm-and-short-lived foam. They are independent.
| Application | Density | ILD | Typical thickness |
| Dining chair seat | 1.8 to 2.2 lb/ft³ | 35 to 45 | 1.5 to 3 inches |
| Armchair / sofa seat, daily use | 2.0 to 2.5 lb/ft³ | 35 to 40 | 4 to 5 inches |
| Back cushions | 1.5 to 1.8 lb/ft³ | 18 to 30 | Varies |
| Heavier users or firm preference | 2.5 lb/ft³ and up | 40 to 50 | Varies |
For seats in regular use, 1.8 lb/ft³ is the practical minimum density, with 2.0 to 2.5 preferable for longevity. Cheap foam sold in craft shops is often 1.0 to 1.5 lb/ft³, which is fine for a headboard and wrong for a seat. Given how much labour goes into a chair, saving fifteen dollars on foam is a bad trade.
High-resilience (HR) foam is a specific classification, not a marketing word. It is worth the premium on seats that get daily use.
Cut foam with an electric carving knife, a serrated bread knife, or a foam saw, in one continuous stroke rather than sawing back and forth. Cut it slightly oversize, roughly 1/4 to 1/2 inch larger than the seat panel on each side, so the cover compresses it into a full, square edge rather than a soft, collapsing one.
When foam must be replaced
Press it with your palm and let go:
- It stays indented, or recovers slowly: replace it.
- It crumbles, sheds orange or yellow dust, or tears at the edge: replace it. Degraded polyurethane cannot be rescued.
- It is visibly lower in the sitting area than the edges: replace it.
- It smells: replace it. Odour is in the cells.
- It rebounds immediately, is uniform, and is intact: keep it, clean it, and add a fresh batting wrap.
Batting
Polyester batting (Dacron) goes over the foam, never under it. Its jobs are to soften the hard perimeter of the foam into a rounded edge, give a first-touch softness before the foam’s resistance, and stop the fabric abrading directly against the foam. Wrap it over the top and down the sides, staple it on the underside or the rail, and trim it back from the staple line so it does not bulk up under the fabric and create a lumpy edge.
On an old chair, a layer of cotton felt or a thin foam sheet between the springs and the main foam is worth adding. It stops the spring pattern from telegraphing through in a year’s time.
Webbing and suspension
Webbing is the foundation. If it has failed, nothing above it can compensate.
Jute webbing is traditional, 3.5 inches wide, and graded by stripe: red stripe at 11 lb is the heavy grade used for seats, black stripe at 9 lb is a medium grade used for backs. Elastic or polypropylene webbing has built-in stretch and is common in modern shops for cushioned seats without springs. Sinuous (zigzag) springs clip to the front and back rails and are held in line by helical wires.
When to replace webbing:
- Strands are torn, frayed, or sagging visibly when you press the seat.
- Any strip has pulled free of the rail, or the tack line has split the wood.
- The seat dips noticeably in the middle even with good foam.
- Jute has gone brittle and snaps when flexed.
How to do it properly:
- Mark the spacing before you remove the old webbing. Standard residential practice leaves roughly 1.5 to 2 inches of gap between strips, which is close enough that no support gaps can be felt through the foam.
- Work front to back first, then weave the side-to-side strips over and under in a basket weave. Weaving is not decorative. It distributes load across the whole grid instead of individual strips.
- Fold the starting end back on itself by about 1.5 to 2 inches and staple through the doubled layer with five or more staples in a staggered pattern. A single-layer end will pull out.
- Tension with a webbing stretcher, not by hand. The seat should feel drum-taut, not merely snug.
- Watch the rail while you tension. If the rail flexes or the old tack holes start weeping, stop. You are about to split the frame. A rail that cannot take tension needs repair first.
- Staple the far end under tension, then fold and staple again through the doubled layer.
That double-fold rule applies everywhere in upholstery. Any strap or webbing fastened as a single layer will eventually tear at the staple line.
Step-by-step: how to reupholster a chair
Step 1: Document the chair before touching anything
Photograph every side, every corner, and every joint. Then photograph each layer as you expose it. Shoot close-ups of how each panel is folded at the corners and where each fastener sits.
This is not optional. The old chair is your instruction manual, and once it is in pieces there is no way back. Shops that skip this step on unfamiliar frames regret it.
Also: write down the order in which panels come off. They go back on in exactly the reverse order.
Step 2: Strip the old upholstery
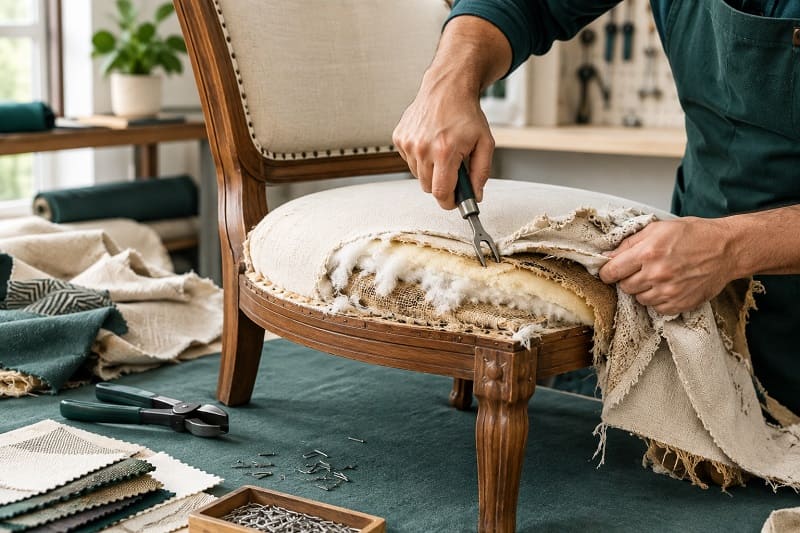
Work in reverse assembly order. On a typical armchair that means outside back, outside arms, arm fronts, inside back, inside arms, deck, in roughly that sequence, though every chair differs.
Technique that saves your hands: slide the forked tip of the staple remover under the staple crown, rock it to lift, and pull the staple straight out. If a leg breaks off, grip it with end nippers and pull along the direction of the leg. Prying sideways snaps it flush and leaves a spike in the wood.
Remove every last staple and tack. Leftover staple legs telegraph through new fabric as a visible bump, and they catch and tear the cover as you tension it. This is tedious and it is also the difference between a clean job and a lumpy one.
Keep and label every piece of old fabric. Write the location and the orientation (for example “inside arm, left, top toward arm roll”) directly on the wrong side with a marker. These are your patterns, already shaped by the chair.
Use a seam ripper rather than scissors to take apart any sewn sections, so the pieces stay full size.
Step 3: Inspect and repair the frame
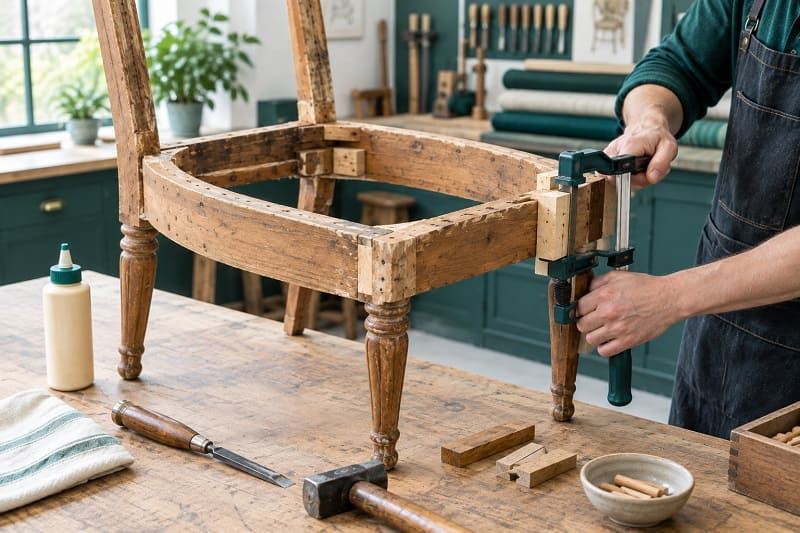
With the chair bare, this is your only chance.
- Rock the frame side to side. Any movement means a loose joint.
- Check every corner block. These are the triangular braces inside the corners of the seat frame. They should be glued and screwed and immovable. Re-glue and re-screw any that move.
- Look for splits along the tack rails, especially where generations of staples have chewed the wood. A split rail can be glued and clamped, or reinforced with a new strip of hardwood glued and screwed alongside.
- Drill and fill badly chewed rails. If a rail is so perforated it will not hold staples, inject wood glue, pack with fine sawdust or wood filler, let it cure, then sand flat. New staples need solid wood.
- Re-glue loose doweled joints properly. Separate the joint, scrape out the old glue, apply fresh PVA or hide glue, clamp square, and let it cure overnight. Squeezing glue into a joint without disassembling it does not work; the old glue layer blocks it.
- Do any refinishing, sanding, staining, or painting of show wood and legs now, while no fabric is in the way. Let finishes cure fully before upholstering.
Step 4: Rebuild the suspension and padding
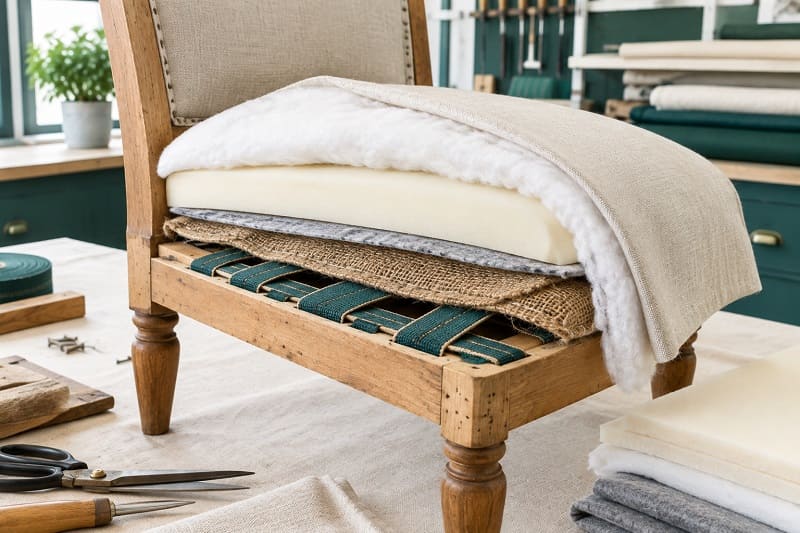
Replace webbing and springs as covered above, then rebuild the layers in order:
Webbing → burlap over springs (if sprung) → cotton felt or thin foam → main foam → polyester batting → cover fabric
Each layer has a purpose. Skip the burlap and the springs will eat the foam. Skip the batting and the foam will abrade against the fabric and the edges will look hard and square.
Attach foam with a light spray of upholstery adhesive, not a heavy coat. You want it located, not welded. Heavy adhesive stiffens the foam surface and can show through thin fabric.
Step 5: Pattern and cut the new fabric
Lay the old panels face down on the wrong side of the new fabric, matching grain direction, and trace around them with chalk. Add back any allowance the old pieces had lost to previous trimming, usually an extra inch.
Grain rule: the lengthwise grain (parallel to the selvedge) runs top to bottom on every panel. Vertical grain resists stretching downward where the body loads the fabric. Cutting a panel off-grain is the single most common cause of a cover that looks fine on day one and sags within months.
For patterns: decide where the dominant motif sits on the inside back and the seat deck, and centre it. Then centre everything else to match. Mark the centre line of both the fabric and the chair panel with chalk so you have a reference during fitting. A well-centred pattern is what makes a home job read as professional.
Cut generously. Leave at least 3 to 4 inches beyond the finished area on every panel, more on curves. You can always trim. You cannot add.
Mark the back of each cut piece with its location and the word “TOP”. On a chair with several similar panels, this saves genuine confusion later.
Step 6: Position the fabric and set anchor staples
This is the step that separates good results from bad, and almost no guide mentions it.
Place the panel on the chair. Line up your chalk centre line with the chair’s centre line. Then set exactly four staples: one at the centre of each side. Four staples only.
Now stand back and look. Is the pattern square? Is the grain vertical? Is the panel sitting in the same place it will finally sit? If not, pull those four staples and reposition. Four staples are cheap. Forty are not.
Only once the panel is right do you commit to the rest.
Step 7: Tension and staple in the correct sequence
The sequence is centre out to corners, alternating sides.
Staple outward from the centre anchor along one side for three or four staples. Then go to the opposite side and do the same, pulling against the first side. Then the remaining two sides, again opposite to each other. Keep circulating outward until you are a few inches from each corner. Leave the corners until last.
What “tension” actually means. Pull firmly enough that the fabric is smooth and the weave is straight, but not so hard that the weave distorts. Watch the threads: if the vertical threads start bowing or the weave opens up, you are overpulling. Overtensioned fabric pulls the foam out of shape, shortens the life of the cover, and creates diagonal stress lines from the corners. Uniform is more important than tight.
Staple spacing. Roughly 1 to 1.5 inches apart on the main runs, closer on curves and corners. Angle the staple crown roughly perpendicular to the direction of pull, so the crown resists the load rather than lying along it.
Check the face every few staples. It is far easier to remove six staples than sixty.
Step 8: Corners and curves
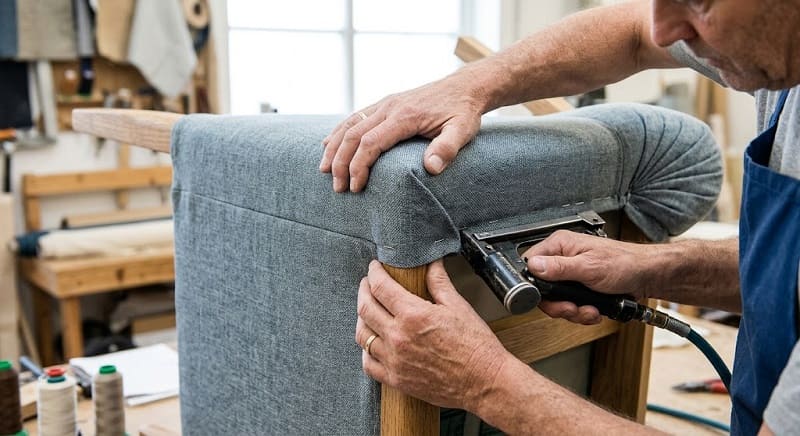
Corners are where most projects visibly fail. The method depends on the shape.
Square corners (typical drop-in seat). Pull the fabric straight up over the corner point first and set one staple at the very corner. Then fold each side down against it, forming two clean folds like the end of a wrapped parcel, and staple each fold. The single corner staple takes the bulk so the folds sit flat instead of bunching.
Rounded corners. Do not fold. Instead, gather the excess into a series of small, even pleats, all facing the same direction. Even beats invisible here. Three matching pleats look deliberate. One large pleat and two small ones look like a mistake.
Curved backs and scroll arms. Relief cuts are the tool. Snip into the seam allowance perpendicular to the curve, stopping about 1/4 inch short of the finished line, so the fabric can splay open on an outside curve or overlap on an inside curve. Cut a few, test the lay, cut a few more. Cutting too far cannot be undone.
Around chair legs and posts. Make a Y-cut: cut in toward the post, stopping just short, then make two short diagonal cuts out to the corners of the post. Tuck the resulting tabs around the post and staple. Cut short, test, extend the cut if needed.
Bulk management. Upholstery fabric is thick, and four layers folded in a corner will show as a lump through the cover. Trim away the inner layers of the fold before the final staple so only one or two layers carry through. Professionals trim aggressively inside folds for exactly this reason.
Step 9: Hide the fasteners
Visible staples are the giveaway on amateur work. Three trade solutions:
Blind tacking with cardboard tack strip. For a straight finished edge such as the top of an outside back: lay the fabric face down against the chair, positioned upside down, place the 1/2 inch cardboard strip along the fold line, and staple through both. Then flip the fabric down over the strip. The result is a razor-straight edge with no staples showing and no stitching required.
Flexible metal tack strip (Ply Grip). For the vertical edges of outside backs and outside arms. The strip is stapled to the frame, the fabric edge is hooked into its teeth, and the strip is closed with a rubber mallet. Gives a machine-clean closed edge.
Hand-sewn blind stitch. A curved needle and waxed thread, slip-stitching an outside back panel to the adjoining panel. Slower, but the only option on some shapes, and invisible when done well.
On show-wood chairs, the staple line along the frame is covered with gimp braid (glued), double welt (glued or tacked), or decorative nailhead trim. If using nailheads, mark spacing first with chalk or a nail spacing tool. Uneven nailhead spacing is more visible than any other error on a chair.
Step 10: Welt and piping
Welt (also called piping) is fabric-covered cord sewn into a seam or applied along an edge. It does two jobs: it hides the junction between panels and it gives the chair a defined line.
Cut welt strips on the bias (45 degrees to the grain) when they have to go around curves, because bias-cut fabric bends without puckering. Straight-cut strips are acceptable only on straight runs. Cut the strip about 1.5 inches wide for 5/32 inch cord, wrap it around the cord, and sew close to the cord with a zipper or welt foot.
Where two welt ends meet, open the fabric on one end, trim the cord ends so they butt rather than overlap, fold the raw fabric edge under, and lap it over the other. Two overlapping cords make a visible bulge.
Step 11: Finish the underside
Cut black cambric dust cover to the shape of the chair bottom, fold the raw edges under by about 1/2 inch, and staple it to the underside of the frame, cutting around the legs.
This takes ten minutes and it matters more than its cost suggests. It hides every raw edge and staple, keeps dust and debris from falling out of the padding, stops the interior filling from shedding onto the floor, and is the first thing anyone knowledgeable checks when they turn a chair over.
Step 12: Reassemble and inspect
Screw the seat back in place with the original hardware, checking that no fabric is blocking the screw holes. If a screw will not seat, back it out and check for a trapped fold rather than forcing it.
The final inspection. Do this properly:
- Raking light. Set the chair near a window or shine a lamp across the surface at a low angle. Side light reveals ripples, hollows, and telegraphing that flat overhead light hides completely.
- Sit in it. Both centrally and toward each front corner. Listen for creaks. Feel for the seat bottoming out or for a spring edge.
- Run your palm over every surface. You are feeling for staple legs left in the frame, lumps of trimmed batting, and hard edges where foam was not wrapped.
- Check the corners against each other. On a set of dining chairs, corners should match chair to chair, not just look acceptable individually.
- Turn it over. Underside should look finished.
- Leave it a week, then look again. Fabric relaxes slightly. Small ripples often settle. If a ripple is still there after a week, it is a tension problem, not a settling one.
Common mistakes beginners make
Choosing the wrong chair. Covered at length above because it is the most expensive error available.
Not photographing before stripping. The chair was the instruction manual and you threw it away.
Leaving staple fragments in the frame. They telegraph through and snag the new cover.
Cutting fabric to the finished size. Always cut oversize. Every beginner underestimates how much fabric a curve consumes.
Ignoring grain direction. Off-grain panels stretch, sag, and cannot be fixed later.
Stapling from one side across to the other. Fabric migrates, and by the fourth side you have pushed all the slack into one corner.
Overtightening. Distorts the weave, deforms the foam, and puts permanent diagonal stress lines at every corner.
Reusing dead foam because it “looks fine”. Foam fails from the inside. Test it by compression, not by appearance.
Skipping the batting layer. The result is hard, square edges and premature wear where fabric rubs foam.
Skipping the dust cover. Instantly reads as unfinished.
Buying fabric in two orders. Dye lots vary. Buy all of it at once.
Using quilting cotton or dress fabric. It will not survive seating use no matter how good the print is.
Working on the floor. Get the chair up onto a bench, sawhorses, or a table at hip height. You cannot control tension while crouching, and your back will pay for the whole project.
Troubleshooting: wrinkles, sag, and visible staples
| Problem | Likely cause | Fix |
| Diagonal wrinkles running from a corner | Uneven tension, one side pulled harder than the other | Remove staples back to the nearest anchor and re-tension both sides equally |
| Ripples parallel to one edge | Not enough tension on that edge, or fabric cut off-grain | Re-tension; if off-grain, the panel needs recutting |
| Fabric looks loose after a few weeks | Undertensioned, or the foam has compressed | Re-tension the panel. If the foam has flattened, the foam is the problem |
| Lump under the fabric | Staple fragment, trimmed batting caught under the cover, or a fold not trimmed | Remove staples locally, find and remove the object, re-staple |
| Corner is bunched and thick | Too many fabric layers left in the fold | Open it, trim the inner layers, refold |
| Visible staples along a finished edge | No blind tacking or trim planned | Cover with gimp braid, double welt, or nailhead trim, or redo with cardboard tack strip |
| Seat feels hard at the front edge | No batting wrap, or foam cut undersize | Add a batting wrap; if the foam is short of the edge, recut it oversize |
| Seat sinks in the middle | Webbing or springs, not foam | Turn the chair over and rebuild the suspension |
| Pattern is off-centre | Panel committed before checking | Remove and reposition. This is why four anchor staples exist |
| Fabric puckers around a curve | Not enough relief cuts | Add more relief cuts, each stopping short of the finished line |
A useful general rule: if something looks wrong, it will look worse tomorrow. Pull the staples now. Removing twenty staples takes two minutes. Living with a bad panel takes years.
Safety when stripping and stapling
Upholstery injuries are unglamorous and common.
- Eye protection during stripping is essential. Old staples fly when they release, and tacks are launched unpredictably by a lifter under load.
- Cut-resistant gloves for staple removal, but bare or thin-gloved hands for tensioning fabric, where feel matters.
- Keep a magnetic sweeper or a magnet on a stick nearby and sweep the floor regularly. Every old staple you drop is looking for a foot.
- Never reach across the nose of a staple gun, and never leave a pneumatic gun connected when you set it down. Staple guns will drive a staple straight through a finger without slowing down.
- Disconnect the air line or battery before clearing a jam.
- Watch the dust. Old chairs contain decades of dust, and old foam sheds fine polyurethane particles. Work outdoors or in a ventilated space and wear a dust mask while stripping.
- Spray adhesive needs ventilation. Read the label, work outdoors where possible, and keep it off your skin.
- Very old chairs may contain horsehair, straw, or other traditional stuffing that can be dusty and irritating. Handle it wet or bagged, and do not tear it apart indoors.
- Lift correctly. Armchairs are heavier than they look and awkward to turn.
- Cut foam away from your body with the blade tracking parallel to your hand, not toward it.
Professional habits worth borrowing
These are the small things that most guides do not mention and that make a visible difference.
- Work in the reverse of the original build order. The chair was assembled in a sequence for a reason. If you install the outside back before the outside arms, you will have to remove it.
- Use four anchor staples before committing to any panel. Already covered above, but it deserves repeating because it costs nothing and prevents the most common failure.
- Trim inside your folds. Bulk in a corner shows through the cover. Reducing four layers to two makes the difference between a crisp corner and a soft lump.
- Buy a regulator and learn to use it. It lets you redistribute stuffing and coax a wrinkle out through the fabric without unstapling anything. Slide it under the cover, work the padding into position, and the fabric follows.
- Inspect under raking light, not overhead light. Every professional does this. Overhead light flattens surfaces and hides ripples.
- Do a set together, not one at a time. If you have four dining chairs, strip all four, cut all the pieces at once, then cover all four. Consistency improves, and the total time drops significantly.
- Order two extra yards on a patterned fabric. Pattern matching consumes more than you estimate, and a second dye lot will not match.
- Staple the dust cover last, and cut around the legs rather than under them. Cutting a slot to the leg and folding the edges gives a clean finish that a straight cut cannot.
- Label the underside with the date, the fabric name and supplier, and the foam specification. Write it on the cambric with a marker before you staple it. The next person to open the chair, possibly you in ten years, will thank you.
- Practise on the outside back first if you can. It is the least visible panel on most chairs and the same technique as the rest.
- Do not fight the fabric’s memory. Let a rolled fabric relax flat for a day before cutting. Creases from the roll show under tension.
- Keep the offcuts. Store a piece of the remaining fabric with the chair. Spot repairs and replacement welt become possible years later.
Final thoughts on reupholstering a chair
The craft part of learning how to reupholster a chair is not the stapling. It is the judgment: recognising a frame worth saving, reading whether foam has life left in it, knowing when a seat needs new webbing rather than new fabric, and stopping to fix something that looks slightly wrong instead of stapling past it.
Start with a drop-in dining seat. It teaches the entire method (grain, tension, sequence, corners, dust cover) at a scale where mistakes cost a yard of fabric rather than a weekend. Then move up. Most people who do one chair properly end up doing five, because once you can see how furniture is built, it stops being disposable.
Frequently asked questions about reupholstering a chair
A drop-in dining seat takes about one to two hours for a first attempt and under an hour once you are practised. A dining chair with an upholstered back takes half a day. A fully upholstered armchair with piping is realistically 15 to 25 hours of work for a beginner, spread over a weekend or more. Stripping alone can take two to four hours on an older armchair because of the sheer number of staples.
Yes, for drop-in seats, pull-over seats, and many simple chairs. Everything is stapled. You need a sewing machine only for welt, cushion covers, skirts, and joined panels. On an armchair you can sometimes avoid sewing by buying pre-made welt and using tack strip, but the result is more limited.
You can on a simple drop-in seat if the old fabric is clean, smooth, thin, and intact, and it saves stripping time. It is not the better option. Every extra layer adds bulk, makes corners thicker and harder to fold neatly, hides whatever is failing underneath, and can prevent the seat from seating back into its frame. On anything more complex than a slip seat, strip it.
Only if it has failed. Press it and watch the recovery. If it springs straight back, is uniform, does not crumble, and does not smell, keep it and add a fresh batting wrap. If it stays indented, sheds particles, sits lower in the middle, or has a smell, replace it. Since fabric and labour are the expensive parts, replacing questionable foam while the chair is open is usually the right call.
Upholstery is covering a frame for the first time. Reupholstery is stripping an existing piece back, repairing or replacing the internal components, and covering it again. Reupholstery involves more diagnostic work because you are dealing with whatever the previous maker and previous repairs left behind.
Doing it yourself costs mostly the price of fabric: roughly $25 to $60 in materials for a simple dining seat, and $150 to $500 for an armchair. Professionally, most chair reupholstery falls between $300 and $1,100, with a typical figure around $750, varying with chair size, fabric price, and any frame or spring repairs needed.
It depends entirely on the frame. Reupholstering a well-built hardwood chair is usually cheaper than buying an equivalent quality new piece, and you get to choose the fabric. Reupholstering a low-cost modern chair with an engineered-board frame is almost never economical. Compare the total quoted cost against the price of a comparable secondhand chair in good condition, not against a new budget chair.
A tightly woven, medium-weight upholstery fabric rated at 15,000 double rubs or more for a chair in daily use, and 30,000 or more for a busy household. Polyester, olefin, wool, and quality blends all perform well. Avoid quilting cotton, dress fabrics, and stretch knits. Order swatches and check them in your own room’s light.
Roughly half to three-quarters of a yard for a drop-in dining seat, 5 to 7 yards for a standard armchair, and 6 to 8 for a wing chair, based on 54 inch wide plain fabric. Add for pattern repeats, directional fabrics, and a 10 to 15 percent margin on a first project.
Fine-wire staples in 20 to 22 gauge, usually 3/8 inch for general work on hardwood frames and 1/2 inch for webbing or multiple layers. Construction staples are too heavy and split the wood.
Pull the fabric over the corner point and set one staple there first, then fold the two sides down against it and staple each fold. On rounded corners, use several even pleats all facing the same direction rather than trying to hide a single large fold. Trim the inner layers inside every fold so bulk does not show through. Even and deliberate always looks better than improvised.
Plan the finish before you start. Use cardboard tack strip to blind tack straight edges, flexible metal tack strip on outside backs and arms, and gimp braid, double welt, or nailhead trim wherever the staple line sits on show wood.
Tread carefully. If the chair has original traditional stuffing such as horsehair, or original springs and tacks, stripping it can destroy its value, and re-tying eight-way springs is a genuine skill. Get an assessment before you touch it. Later reproduction antiques with foam and modern webbing are fair game.
Only if it is torn, frayed, brittle, pulled loose, or visibly sagging under pressure. Jute goes brittle with age and snaps when flexed, which is a clear signal. If any strip has failed, replace the whole grid rather than patching, since the remaining strips are the same age.
Cut on-grain, set four anchor staples before committing, and work centre outward alternating opposite sides so the tension balances. Use relief cuts on curves. Aim for even tension rather than maximum tension. If a wrinkle survives a week of settling, remove the staples back to the nearest anchor and redo that section.